
I’ve been wrestling with CSS cascades for years, and let me tell you, it’s like trying to untangle Christmas lights in the dark.
Messy specificity battles and unexpected overrides have cost me hours. Then I stumbled across the CSS revert-layer keyword.
CSS revert-layer is your escape hatch from cascade chaos. It’s part of the CSS cascade layers family, alongside tools like @layer, specificity rules, and the :where() function. It’s been around but underused, now it’s ready to clean up your style sheets with precision.
Pro tip: Don’t confuse revert-layer with revert; the former resets styles to the previous cascade layer, not the browser’s defaults.
How Layers Works
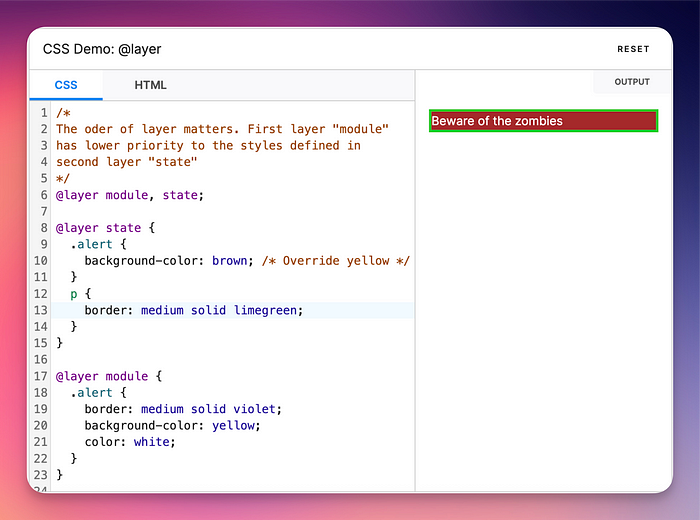
With @layer, you group your styles into named or anonymous layers, setting their priority in the cascade.
How Layers Works
Declare layers with @layer, and earlier layers override later ones, giving you predictable control.
You can define layers upfront or append rules later, keeping your style sheet modular.
This structure lets you manage complex projects without drowning in specificity battles.
@layer base, components, utilities;@layer base {
button { background: gray; }
}@layer components {
.modal button { background: blue; }
}The order matters, earlier layers override later ones, giving you a predictable hierarchy.
@layer base, components, utilities; /* Define layer order upfront */@layer base {
body { background: white; }
}@layer components {
.card { border: 1px solid; }
}You can append rules to layers later, even without redeclaring them.
This flexibility keeps your style sheet modular, perfect for large teams or evolving designs.
Anonymous layers, created without names, are great for one-off rules but can’t be reused.
@layer { /* Anonymous layer */
.temp { color: gray; }
}@layer components {
.card { padding: 1rem; } /* Appends to existing components layer */
}How Layer Differs from !important
Using !important is like smashing your cascade with a hammer, it overrides everything, ignoring structure.
It creates conflicts that are hard to debug and maintain, especially in teams.
The @layer rule, by contrast, organizes styles into a clear hierarchy, letting you control precedence without brute force.
You get intentional style management, not a cascade crisis.
/* Without layers, !importance causes chaos */
button { background: gray !important; }
.modal button { background: blue; } /* Ignored due to !important *//* With layers, control is clean */
@layer base, components;
@layer base {
  button { background: gray; }
}
@layer components {
.modal button { background: blue; } /* Wins due to layer order */
}How revert-layer Works
Revert-layer resets a property to the value defined in the previous cascade layer, respecting the @layer hierarchy you’ve set up.

How revert-layer Works
Without layers, it falls back to inherited or browser default values, but within a layered system, it’s your key to undoing specific overrides cleanly.
It’s like a targeted undo button for your CSS, perfect for complex UIs or team projects.
@layer base, components;@layer base {
button { background: gray; }
}@layer components {
.modal button { background: blue; }
.modal button.reset { background: revert-layer; } /* Resets to gray from base */
}@layer base, overrides;@layer base {
.card { padding: 1rem; } /* No font-size defined */
}@layer overrides {
.card--special { font-size: 20px; }
.card--reset { font-size: revert-layer; } /* Falls back to browser default */
}Technique #1: The Comprehensive Fix
Overreliance on !important or high-specificity selectors often leads to brittle code.
You end up with a cascade that’s nearly impossible to debug. With revert-layer, you can reset styles to the intended layer’s rules, keeping your code clean. Think of isolating a modal’s styles without affecting global buttons.
@layer base, components;@layer base {
button { background: gray; }
}@layer components {
.modal button { background: blue; }
.modal button.reset { background: revert-layer; }
}Compare this to !important hacks, which pile up and haunt you later.
Use revert-layer intentionally, overdoing it might reset more than you expect.
@layer base, components, utilities;@layer base {
button { padding: 1rem; }
}@layer components {
.modal button { padding: 2rem; }
}@layer utilities {
.reset-padding { padding: revert-layer; }
}Technique #2: The Precision Fix
Revert-layer gives you surgical control over style resets in complex components. A dropdown menu inheriting unwanted margins from a parent?
One line fixes it.
@layer base, ui;@layer base {
nav { margin: 1rem; }
}@layer ui {
nav .dropdown { margin: revert-layer; }
}You can also use it for user-driven themes, like switching between light and dark modes, without rewriting base styles.
It’s like hitting undo on specific properties while keeping the rest intact.
@layer base, themes;@layer base {
body { color: black; }
}@layer themes {
.dark-mode { color: white; }
.dark-mode .text-reset { color: revert-layer; }
}Technique #3: The Evolution Fix
Scaling a design system often means wrestling with legacy styles. They creep into new components, creating visual inconsistencies.
Revert-layer organizes your cascade into logical layers, letting you update without breaking older code.
It’s a clean way to manage versioning across teams.
@layer legacy, v2;@layer legacy {
.btn { font-size: 14px; }
}@layer v2 {
.btn { font-size: 16px; }
.btn--legacy { font-size: revert-layer; }
}For edge cases like browser-specific quirks, test thoroughly to avoid accidental resets.
Don’t overuse layers, too many can overcomplicate your cascade.
Technique #4: The Fallback Fix
Global styles like box-sizing or typography can override component-specific rules unexpectedly.
Revert-layer steps in as a precise fix, restoring the intended layer’s styles without extra markup.
@layer reset, app;@layer reset {
* { box-sizing: border-box; }
}@layer app {
.container { box-sizing: revert-layer; }
}Check out MDN’s cascade layer docs for advanced layering strategies.
Technique #5: The Priority Fix
High-specificity selectors can feel like a necessary evil for urgent fixes. Pair them with revert-layer, and you’ve got a controlled way to dial back overrides safely.
Smashing Magazine’s guide on cascade layers dives deeper into this balance.
It’s about intentional resets, not chaos.
@layer base, overrides;@layer base {
.card { background: white; }
}@layer overrides {
.card--highlight { background: yellow; }
.card--reset { background: revert-layer; }
}- Scenario 1: Adjusting for accessibility
Resetting font sizes to base layer ensures screen readers use predictable values. - Scenario 2: Enabling interactive states
Revert hover effects to base styles for components like buttons in a form. - Scenario 3: Customizing nested elements
Reset padding in nested lists to align with your design system’s defaults.
Bonus: The Ultimate Fix
Lea Verou’s talk on cascade layers shows how revert-layer can streamline enterprise-grade style sheets.
It’s a game plan for modular, maintainable CSS that scales.
@layer defaults, features, custom;@layer defaults {
.widget { border: 1px solid; }
}@layer features {
.widget--active { border: 2px dashed; }
}@layer custom {
.widget--reset { border: revert-layer; }
}Experiment with confidence, but test across browsers. You’ll find revert-layer bends the cascade to your will.
Final Takeaway
Play with revert-layer, but test it thoroughly. It’s powerful, but you’ll want to map your layers clearly.
Stick around for more cool stuffs about CSS.
Comments
Post a Comment