Edited on Canva Pro
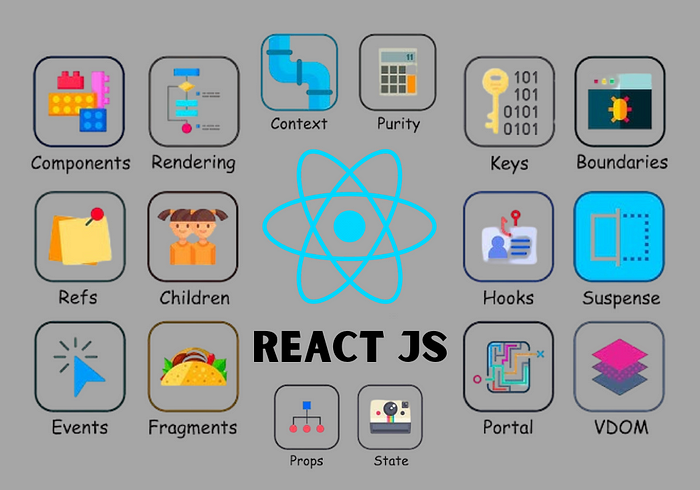
React is a JavaScript library full of fancy terms like reconciliation, composition, and error boundaries.
What do all these terms mean?
Let’s start from the beginning with components.
1️⃣Components
Components are the building blocks of every React app.
They allow us to create all the visible elements of our applications, such as buttons, inputs, or entire pages.
Just like Legos, you can use components as many times as you want.
Every React component is a JavaScript function that returns markup.
2️⃣JSX
React is a JavaScript library.
React components don’t return HTML markup; they return something called JSX, which is JavaScript in disguise.
JSX is optional, but the alternative way to make user interfaces is with a functioncreateElement, which gets annoying to write pretty fast, so everyone just uses JSX.
Since JSX is JavaScript, you can’t write attributes like you would in HTML.
You have to write them in camel case style.
That means HTML attributes like class become className.
3️⃣Curly Braces

Edited on Canva Pro
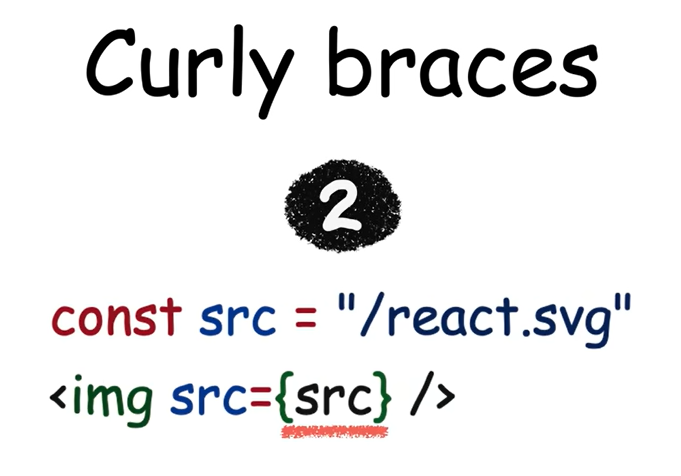
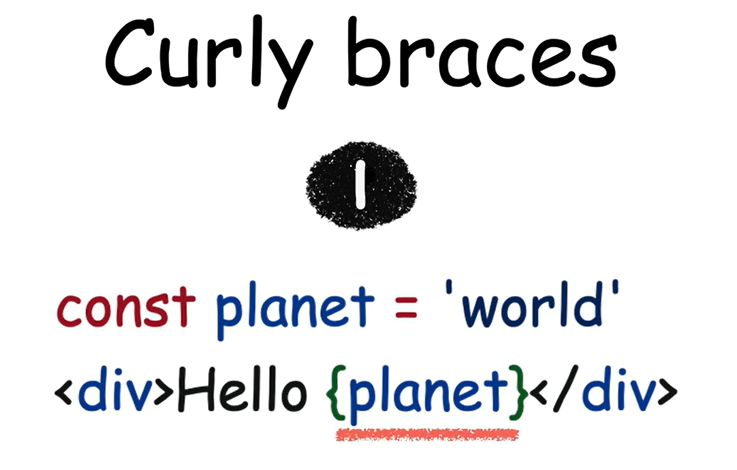
Unlike HTML, which is static and unchanging, the benefit of using React is that you can use dynamic JavaScript values in your JSX.
If you have data, you can display it in your JSX using curly braces.
Curly braces accept values like strings and numbers directly.
You can use them to make your attributes dynamic, and you can style React elements using a JavaScript object within the curly braces.
4️⃣Fragments
Edited on Canva Pro
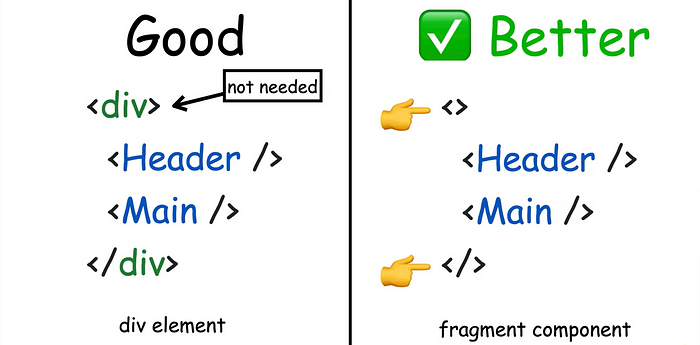
JavaScript functions can only return a single value.
In React, you can only return one parent element from a component, so you can’t do this without getting a big error.
We could fix this by wrapping these components in a<div>, but maybe you don't want to add another element to the page.
Instead, you can use an empty component called a React fragment.
5️⃣Props
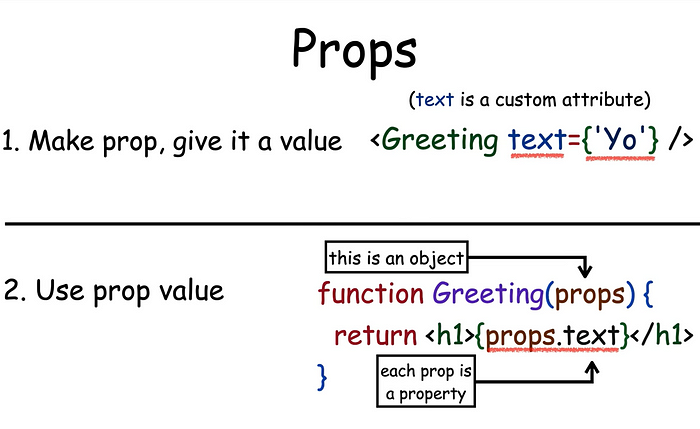
Edited on Canva Pro
But what if I want to pass data into another component?
For that, you use something called props.
To make a prop, create a name on the component you want to pass data to and set it equal to some value, and that’s it!
You can then use that prop in the component you passed it to.
Props refer to properties on an object, which are what you get in the parameters of each component.
To use the prop, take it from the object like a normal JavaScript property.
Think of them like custom attributes you can add to any component.
6️⃣Children
So, wait — can you pass anything as a prop?
Yes, you can!
You can even pass other components as props using the children prop.
If you make opening and closing tags for a component, you can pass other components in between them.
These passed components are called children, and you can access them on the children prop of the parent component.
It’s great for something called composition, which is about organizing our React components most optimally.
The children Prop is really useful for creating layout components when you want your children to have the same common layout.
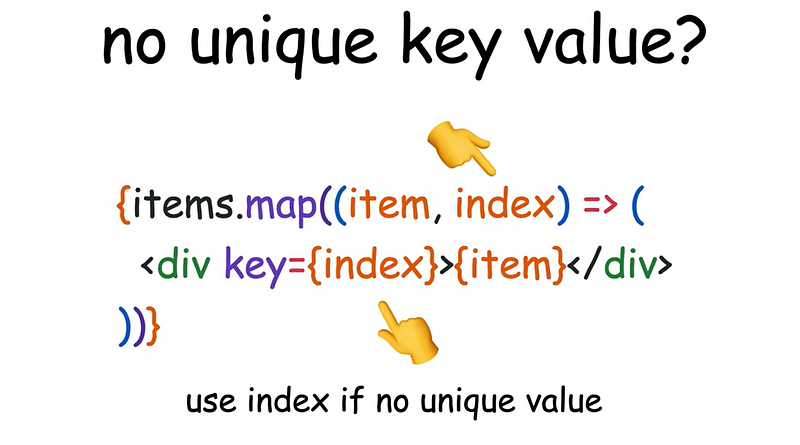
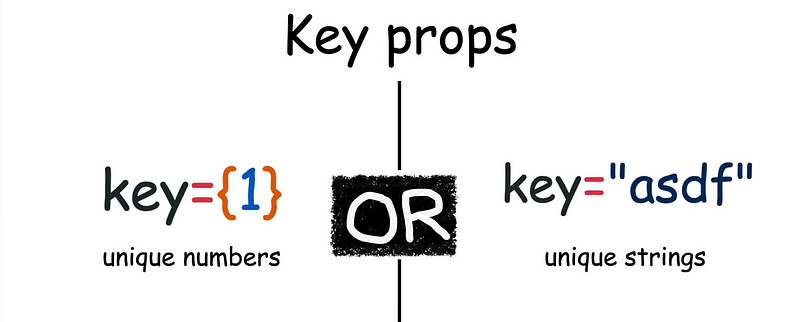
7️⃣Keys
Edited on Canva Pro
The key prop is another built-in prop in React.
No, unlike the name implies, it doesn’t unlock anything interesting.
The key prop is used so React can tell one component apart from another.
Usually, when you’re creating a list with the map function, a key is just a unique string or number to identify a component.
You’ll usually know when you need to add a key because React will warn you in the console.
Fortunately, if you don’t have a unique value for each item, you can always use the current index from the map function.
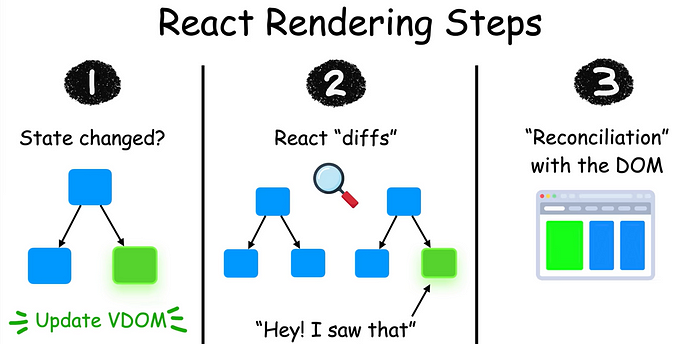
8️⃣Rendering
But how does React take all my amazing code and make it display something in the browser?
That process is called rendering.
React does this for us, but it’s important to know how it works because sometimes we can do a bad thing and cause it to infinitely re-render, which crashes our app.
The way React knows how and when to render our application is by using something called the virtual DOM, also known as the VDOM.
Okay, but what does DOM mean?
DOM stands for Document Object Model, which is what every browser uses to model all the HTML elements on a web page.
When you draw it out, it kind of looks like a tree.
Edited on Canva Pro
Here’s the complete rendering process in React:
- If the state of our React app changes, then React updates the virtual DOM, which is quicker to update than the real DOM.
- Then, React uses a process called diffing to compare the updated virtual DOM to a previous version to see what’s changed.
- Once it sees what’s different, React uses a process called reconciliation to update the real DOM with the changes that it found.
9️⃣Event Handling
Whenever someone uses our app, tons of events take place, like clicks, mouse movements, and key presses — many of which we need to detect.
Event handling is how we take those user events and do something with them.
React has a lot of built-in events, such as onClick, onChange, and onSubmit.
These three events are the ones you’ll probably use the most.
If we want to alert users when a button is clicked, we would add the onClick prop to the button and connect it to a function that would show that alert.
🔟State
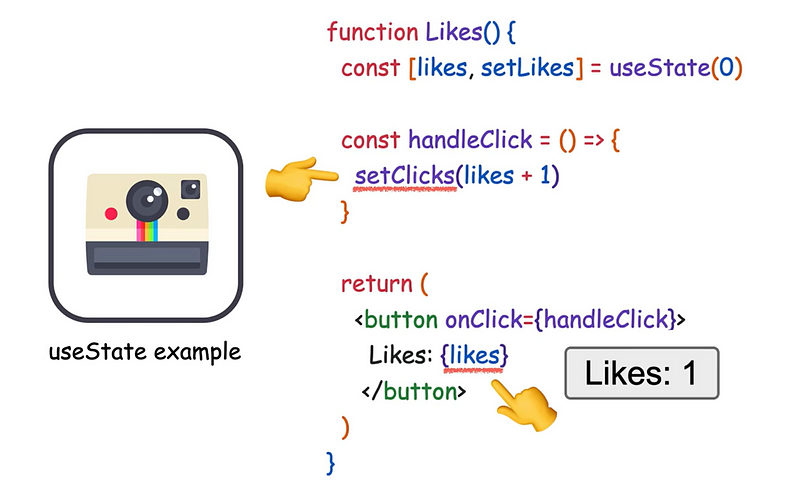
Edited on Canva Pro
To manage data in our React apps, we need to use state — not that kind of state, though!
The state is like a snapshot from a camera; it’s a picture of our app at any given time.
To manage state, we also can’t use JavaScript variables, as they don’t cause our app to re-render.
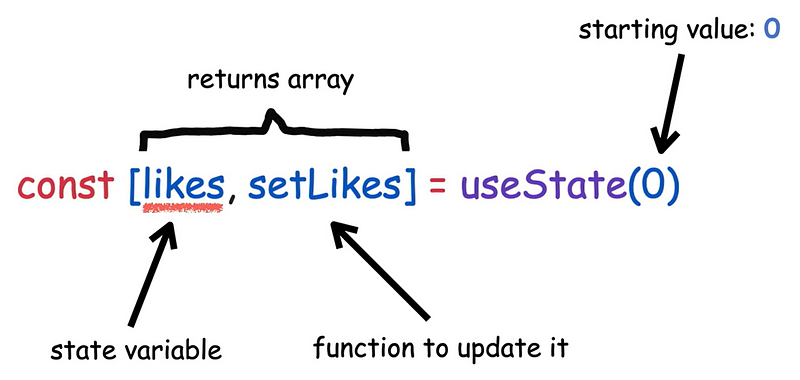
Instead, we use special functions like useState useReducer. useState Takes an argument that serves as the starting value of the state variable (which is likes in this example) and returns an array containing the state variable and a function to update that state.
Using our button example, we could also update the number of times the button’s been clicked with the update function setClicks and display it in the button with the state variable. likes.
1️⃣1️⃣Controlled Components
Edited on Canva Pro
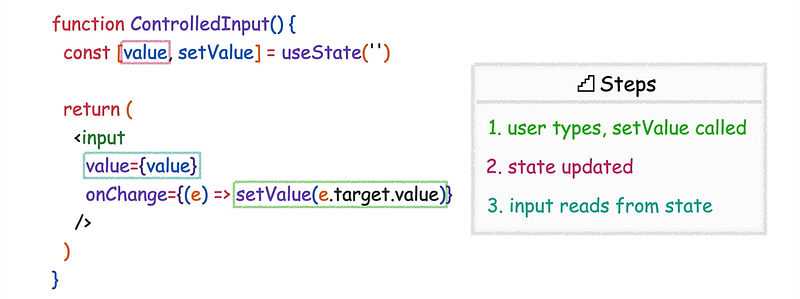
Controlled components use State values to have more predictable behavior.
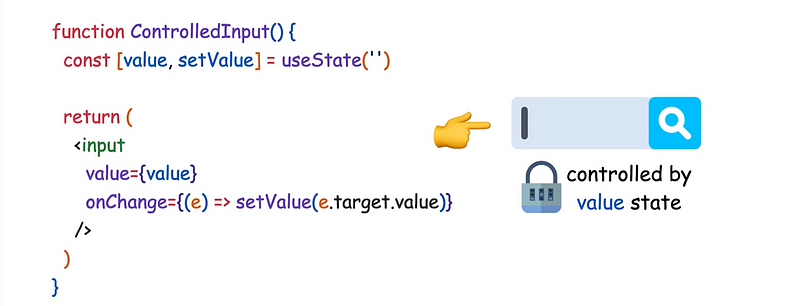
Here’s an example of a controlled component where the value typed into the input is being put into the State and controlled by the state variable value.
Here’s how it works:
The user types, and setValue puts what the user typed into State.
The state value is then updated, and finally, the input uses that updated State as its value.
Controlled components are a great pattern to use because if we want to change the component’s behavior, we just need to change the state that controls it.
1️⃣2️⃣useState Hook
It
useState It is an example of a React hook, which allows us to hook into features such as state within function components.
There are five main types of hooks:
- State hooks like
useStateanduseReducerhelp you manage state within React components. - Context hooks, such as
useContext, let you pass data through React context. - Ref hooks, such as
useReflet you reference things like HTML elements. - Effect hooks, like
useEffectlet you connect with external systems like browser APIs. - Performance hooks, like
useMemoanduseCallback, can improve performance by preventing unnecessary work.
You’ll use all of these hooks at some point, but the majority of the time, you’ll likely use just three hooks in your React components: useState, useEffect, and useRef.
1️⃣3️⃣Purity
Edited on Canva Pro
The word purity might make you think of something like purified water.
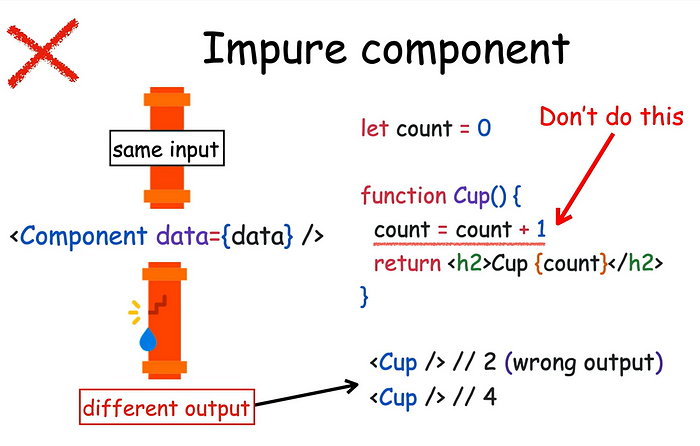
Purity is a term used to describe how React components should work, but this type of purity is more like how mathematical formulas are pure.
Pure React components mean that the same input should always return the same output.
To keep a React component pure, it should only return its JSX and not change any objects or variables that existed before rendering.
The the Cup component in this example is impure because it changes the variable count during render, which exists outside the component.
This leads to the JSX having the wrong output when it is used more than once.
1️⃣4️⃣Strict Mode
To help make sure we don’t run into errors like this, we can use something called Strict Mode.
Strict Mode is a special component that tells us about mistakes as we develop our React apps.
It’s convenient because it’s just a component we usually wrap around our App component, and it'll tell us when we really shouldn't do something.
1️⃣5️⃣Effects
But what if we need to do something outside our React app?
Your app might need to talk with the browser API or make a request to a server.
If you do have an external system, you’re going to need a way to step outside of React.
Effects are code that reach outside of our React application.
Usually, effects (also known as side effects) can be done within event handlers
for example, making an HTTP request when you submit a form or click on a button.
If you can’t run your effects within an event handler, then you can run them using the useEffect hook.
A common pattern is to fetch data when components first load, with the useEffect hook.
1️⃣6️⃣Refs
Like effects, sometimes you want to step outside React and work directly with the DOM.
To reference an actual DOM element, you can use what’s called a ref.
You can create a ref with the useRef hook, and to get access to a DOM element, use the ref prop on any React element.
For some tasks, such as focusing on an input, it’s much easier to reference the actual DOM element instead of attempting to do it the React way.
1️⃣7️⃣Context
Context is a powerful way to pass prop data through your app’s components.
Most React apps have tons of nested components.
To get data down multiple levels involves passing the same props through components that don’t need them.
Context lets us jump through the component tree and use data at any level without making props.
To use context, you first create context in a parent component.
Then, wrap your parent component in a special context component called a Context Provider.
Put the data you want to pass down to the provider, and finally, access that data in any child component with the useContext hook.
1️⃣8️⃣Portals
Portals, on the other hand, are kind of like context but for components.
Portals let you move React components into any HTML element you select.
Portals are great for components that can’t be displayed properly because of their parent component’s styles — for example, displaying modals, dropdown menus, and tooltips.
To create a portal, just use the createPortal function.
Pass your component to it and choose the HTML element where you’d like your React component to appear.
1️⃣9️⃣Suspense
Suspense is a special component that helps you handle loading a component or its data.
Suspense is helpful for components that take some time to fetch data.
It provides a better user experience by showing a fallback component, like a loading spinner, until the data is available instead of showing nothing.
Suspense is also useful if you’re lazily loading a component, which lets us load a component only when it’s needed.
2️⃣0️⃣Error Boundaries
Since React apps are all JavaScript, errors that happen during rendering can totally break your app.
Error boundaries are components that let you catch app-breaking errors and show a fallback component to tell the user what happened.
For example, our app will crash if we run this code because it throws an error when there’s no user.
To prevent our app from crashing, we’ll first add an error boundary to display a fallback component with a more helpful error message for the user.
I hope you learned a lot in this, and I’ll see you in the next one!
Comments
Post a Comment